


Spindle Motor Replacement: 7 Powerful Steps for Easy Success 2025
Why Spindle Motor Replacement Is Critical for Manufacturing Success
Spindle Motor Replacement is the process of removing a failed or worn spindle motor from a CNC machine and installing a new one to restore cutting performance. Here’s what you need to know:
Quick Reference Guide:
- Common Signs: Bearing noise, vibration, overheating, encoder alarms, run-out > 0.002″ TIR
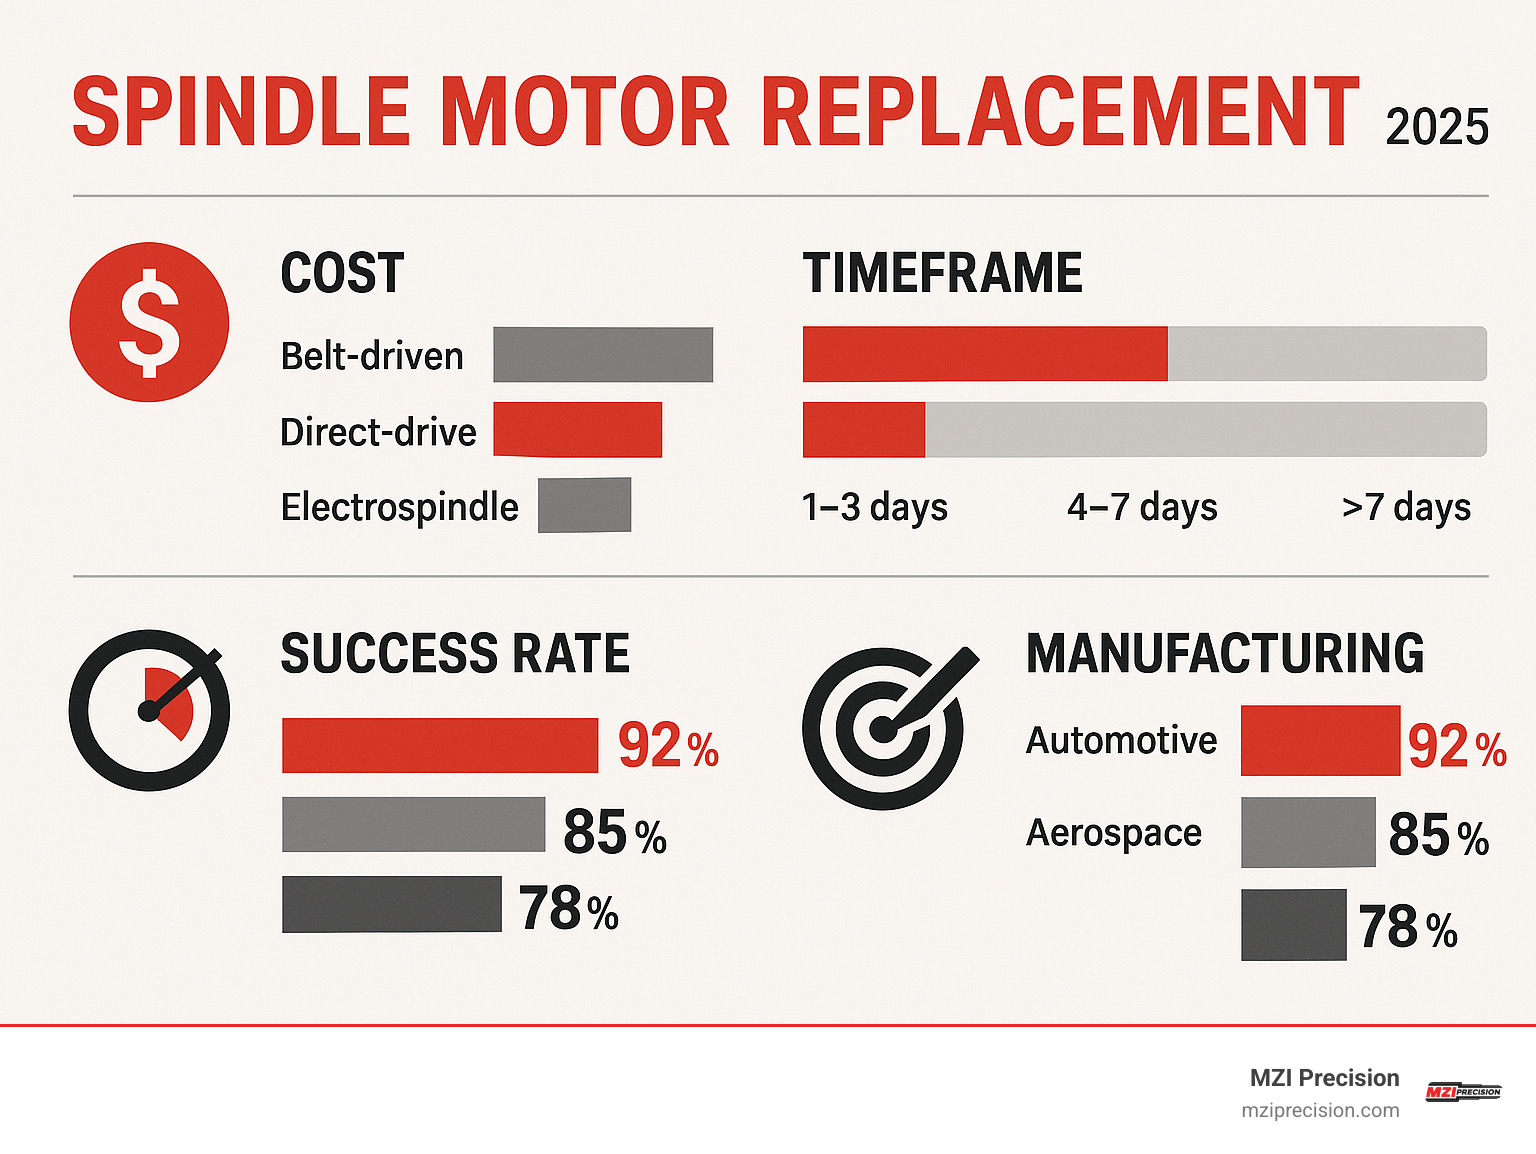
- Typical Cost: $400-$5,600 depending on motor type (PMDC, BLDC, or AC induction)
- Average Time: 4-8 hours for experienced technicians
- Key Tools: T-0058/T-0059 encoder tools, dial indicator, torque wrench, lifting straps
- Critical Step: Maintain run-out tolerance ≤ 0.002″ TIR after installation
When your CNC spindle motor fails, every minute of downtime costs money. A dead spindle motor can shut down an entire production line, but most replacements are straightforward if you follow the right procedure.
The stakes are high in industrial manufacturing. Aerospace components, precision tooling, and critical parts can’t wait for lengthy repairs. That’s why understanding spindle motor replacement helps you make smart decisions about when to tackle the job in-house versus calling for professional help.
This guide covers the complete process for industrial CNC machines – from diagnosing motor failure to testing your newly installed unit. We’ll walk through the differences between PMDC, brushless DC, and AC induction motors, plus the specific steps for both belted and non-contact encoder systems.
Why This Guide Matters
Industrial uptime is everything. When a spindle motor fails, you’re looking at potential losses of thousands of dollars per hour in stopped production. Learning proper spindle motor replacement techniques gives you the power to restore your machines quickly and safely.
The cost savings are substantial too. Professional spindle motor replacement can run $2,000-$8,000 in labor alone, depending on machine complexity. While we always recommend professional service for critical applications, understanding the process helps you make informed decisions about repair versus replacement.
What a Spindle Motor Does Inside a CNC Machine
Think of the spindle motor as the beating heart of your CNC machine. Without it, all those precision cutting tools would just sit there looking pretty. The motor’s job is deceptively simple: spin the cutting tool at exactly the right speed with enough power to slice through whatever material you’re machining.
The magic happens inside the motor housing. You’ve got two main players – the rotor (the part that spins) and the stator (the part that stays put). The stator contains electromagnetic windings that create a rotating magnetic field, while the rotor gets caught up in this magnetic field and starts spinning along with it.
High-speed torque delivery is where industrial spindle motors really shine. We’re talking about speeds typically between 1,000 and 8,000 RPM for most manufacturing applications, but the motor needs to maintain consistent power even when that cutting tool hits a tough spot in the material.
Closed-loop encoder feedback keeps everything running with surgical precision. The encoder constantly tells the CNC controller exactly where the spindle is positioned and how fast it’s spinning. This feedback makes possible all those advanced features like rigid tapping, spindle orientation for automatic tool changes, and constant surface speed control.
AC versus DC architectures each bring their own strengths. AC induction motors are the workhorses – robust and simple. DC motors, including both PMDC and BLDC types, offer excellent speed control and high starting torque that some applications absolutely require.
When any of these systems start breaking down, that’s when you know it’s time to start thinking about replacement options.
Do You Really Need a Spindle Motor Replacement?
Nobody wants to replace a spindle motor unless they absolutely have to. These motors are expensive, and the downtime hurts. But ignoring the warning signs can lead to catastrophic failures that cost far more than a planned replacement.
Your spindle motor is trying to tell you when it’s in trouble. Bearing howl is usually the first cry for help. A healthy spindle runs with a smooth, quiet hum. When bearings start wearing out, you’ll hear a distinctive whining or grinding noise that gets worse as the spindle speeds up.
Torque drop sneaks up on you gradually. Operations that used to run smoothly start bogging down. Your controller shows higher load percentages for the same cuts, or worse, you start getting load alarms on routine jobs.
High temperature readings are your spindle’s way of waving a red flag. Most industrial machines have thermal sensors built into the motor housing. When these start triggering alarms consistently, you’re looking at bearing failure or cooling system problems.
Vibration spikes tell a story if you know how to listen. A handheld vibration meter is worth its weight in gold for spindle motor replacement diagnostics. Healthy spindles typically run at 0.1 G or less per 10,000 RPM. When vibration levels climb significantly above this, you’re dealing with bearing wear, imbalance, or mechanical looseness.
Encoder alarms show up on your controller display when the feedback system starts failing. These might appear as position errors, speed deviations, or complete loss of spindle position data.
Run-out exceeding 0.002″ TIR (Total Indicator Reading) is the kiss of death for precision work. Chuck a test bar in your spindle taper and put a dial indicator on it. If the needle swings more than two thousandths as the spindle rotates, your cutting quality is already compromised.
When is Spindle Motor Replacement Non-Negotiable?
Some failures don’t give you the luxury of planning. Catastrophic winding burn happens when motor windings overheat and fail completely. Seized bearings lock up the entire spindle assembly. Cracked shafts are rare but absolutely catastrophic when they occur – any visible crack requires immediate replacement.
Preparing for the Job – Tools, Safety & Compatibility Checks
Getting ready for a spindle motor replacement is like preparing for surgery – you need the right tools, a sterile environment, and absolute attention to safety.
Safety comes first, period. Your lockout/tagout procedures aren’t suggestions – they’re lifesavers. Hit that emergency stop button, flip the main breaker to OFF, and lock it out with approved tags.
Personal protective equipment includes safety glasses, steel-toed boots, and work gloves. The hoist and lifting straps aren’t optional for motors over 40 pounds. The dial indicator becomes your best friend for checking run-out and alignment – anything over 0.002″ TIR means you’re not done yet.
Feeler gauges help you nail those critical measurements, especially the 3.0mm coupler gap. The specialized T-0058 and T-0059 encoder tools are essential for non-contact encoder systems. Alignment pins ensure your new motor sits exactly where it should, while a quality torque wrench prevents bolt tightening issues.
Before you order a replacement motor, dig into the controller firmware compatibility. Some motor upgrades need parameter file updates that aren’t obvious until you’re halfway through the job.
Motor nameplate verification is detective work that pays off. Write down every specification from that failed motor – voltage, current, power rating, speed, mounting dimensions.
| Motor Type | Advantages | Disadvantages | Typical Cost |
|---|---|---|---|
| PMDC | Simple control, quiet operation | Limited speed range | $400-$1,200 |
| BLDC | High efficiency, excellent torque | Complex control, higher cost | $1,200-$3,500 |
| AC Induction | Robust, reliable | Lower efficiency at variable speeds | $800-$2,500 |
Match New Motor to Controller & Encoder
Voltage compatibility is absolutely fundamental. Current ratings need to match your controller’s output capacity perfectly. Feedback type compatibility determines whether your encoder will actually talk to the controller. Mounting footprint includes bolt patterns, shaft dimensions, and overall motor size.
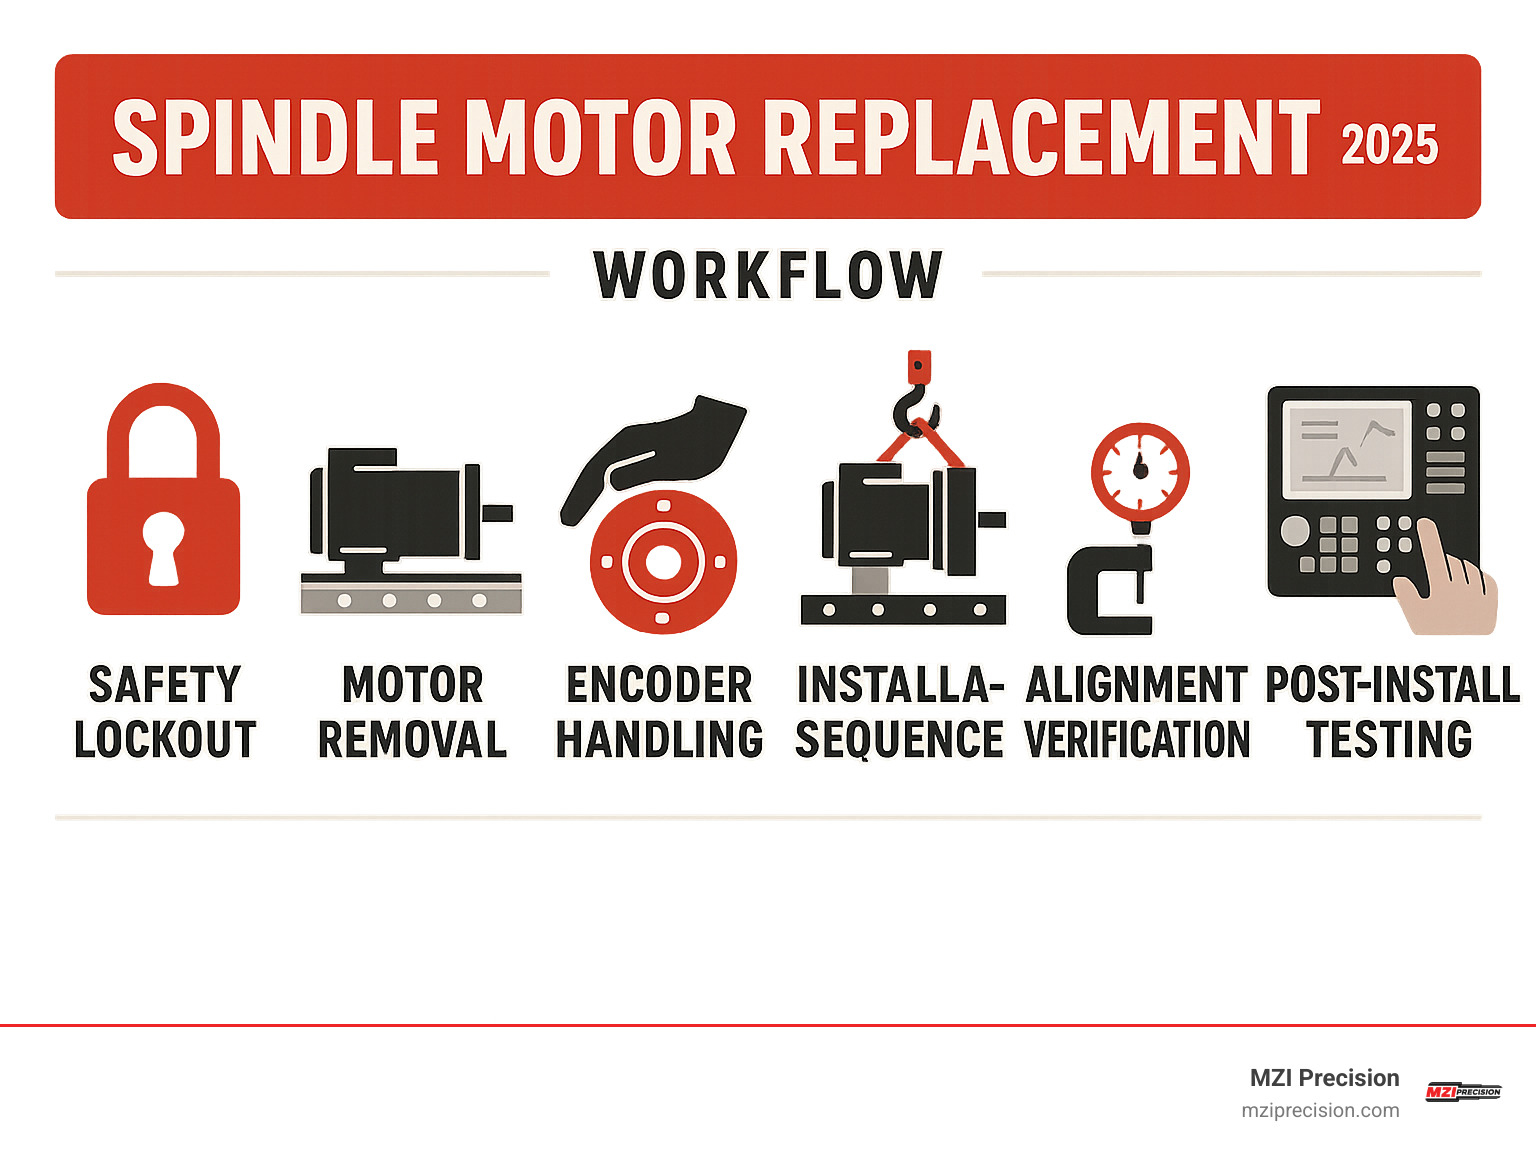
Spindle Motor Replacement: Step-By-Step Procedure
The actual replacement process follows a logical sequence that prioritizes safety and precision. We’ll break this down into manageable steps that apply to most industrial CNC machines.
Specific procedures vary by machine type and manufacturer. Always consult your machine’s service manual for model-specific requirements and torque specifications.
1. Shutting Down & Accessing the Motor
Safety comes first when you’re about to tackle a Spindle Motor Replacement. Emergency stop is your starting point – press that big red button and wait for all motion to completely stop.
The main breaker lockout step separates the professionals from the amateurs. Turn off that main electrical disconnect, then apply your approved lockout device. Tag that breaker with your name and “Spindle Motor Replacement in Progress.”
Removing access covers reveals your workspace. Most industrial CNC machines have multiple panels around the spindle area. Keep those fasteners organized in a small container.
Cable routing documentation might seem tedious, but it’s your insurance policy. Pull out your phone and take multiple photos of wire connections, cable routing paths, and connector orientations. Pay special attention to any cables that might shift when you remove the motor.
2. Safe Removal of the Old Motor
Getting the old motor out safely requires patience and attention to detail.
Label all wires before you touch a single connector. Use masking tape and a permanent marker to tag each wire with its destination.
Disconnect the coolant union if your spindle uses through-spindle coolant. Have a drain pan ready because coolant will spill when you break these connections.
For belt-driven systems, relieve the belt tension first. For direct-drive systems with couplers, you’ll need to disconnect the coupler that links the motor shaft to the spindle shaft.
Now comes the heavy lifting – literally. Lift the motor straight up using proper lifting equipment. Position your lifting straps to balance the load evenly, and make sure you have a clear path upward. Don’t try to angle or twist the motor as you lift.
3. Handling Belted vs Non-Contact Encoders
The encoder system is where things get tricky during spindle motor replacement. Whether you’re dealing with a belted encoder or a non-contact system, precision is everything here.
For belt-driven encoder systems, your first move is relieving that belt tension. Loosen the encoder motor mounting bolts until you can push the belt with your finger and get about half an inch of deflection.
Encoder pulley alignment is absolutely critical. Before you touch anything, grab a permanent marker and make alignment marks on both the encoder pulley and the motor pulley. When the belt comes off, handle it gently.
Non-contact encoder rings are precision components that look sturdy but are actually quite delicate. The ring run-out must stay at 0.002″ TIR or less. This is where those specialized T-0058 and T-0059 tools earn their keep. Don’t use makeshift pullers on these encoder rings.
Ring installation requires the same careful approach in reverse. Once the new ring is in place, break out that dial indicator again. Check the run-out at several points around the ring’s circumference. If you’re seeing more than 0.002″ TIR, something’s not right.
4. Installing & Aligning the New Motor
Now comes the moment of truth – installing your replacement motor with the precision that industrial manufacturing demands.
Start by cleaning and stoning all mating surfaces until they’re spotless. Any burrs, corrosion, or debris will throw off your alignment.
Rotate the top plate 90 degrees during reassembly if applicable. This technique prevents interference with wiring harnesses or mounting standoffs.
Apply lithium grease to all transfer tubes and O-rings before assembly. Use a thin, even layer for lubrication without creating a mess.
The mounting sequence matters. Snug the mounting bolts in a star pattern rather than going around in a circle. Start with finger-tight, then gradually bring them to specification in multiple passes.
Check axial run-out with a dial indicator as you tighten the bolts. Mount the indicator so it reads against the motor shaft or coupling surface. You’re looking for movement as you rotate the spindle by hand.
5. Spindle Motor Replacement for Belted vs Non-Contact Systems
The final installation steps depend on whether you’re working with a belt-driven encoder system or a non-contact encoder setup.
Belt-driven systems require careful attention to tracking and tension. The timing belt must run perfectly centered on both pulleys. Getting the belt tension just right takes finesse – too loose causes position errors, too tight wears out bearings prematurely.
Sheave torque specifications vary widely between machine types, but they’re always critical. Use your torque wrench and follow the manufacturer’s specifications exactly.
Non-contact encoder systems present their own challenges. The gap between the encoder ring and read head is absolutely critical – typically between 0.5mm and 2.0mm. Use feeler gauges to verify the ring gap at multiple points around the circumference.
Read-head clearance must remain uniform as the spindle rotates. Many controllers require a parameter reset after encoder work. Some systems need to relearn their reference position, while others require updates to scaling factors for different motor types.
Post-Install Testing & Troubleshooting
S1000 M03 warm-up is the standard first test. Command the spindle to 1000 RPM clockwise and let it run for several minutes. This allows bearings to seat and reveals any obvious problems.
Vibration measurement should show 0.1 G or less per 10,000 RPM of operating speed. Thermal scanning with an infrared thermometer helps identify hot spots during operation.
Spindle orientation offset may need adjustment after motor replacement. This parameter ensures the spindle stops at the correct angular position for tool changes.
Verification Checklist
RPM accuracy should be within 1% of commanded speed. Load percentage readings help assess motor performance. Surface finish test cuts provide the ultimate performance verification – run a standard test program and compare surface finish to previous results.
Where to Source Motors, Parts & Support
Finding the right parts for your spindle motor replacement can make or break your repair project.
OEM service kits represent the safest choice for mission-critical manufacturing operations. These complete packages include your replacement motor plus all the details – fresh gaskets, proper hardware, and updated parameter files.
Aftermarket BLDC upgrades have become increasingly popular among manufacturers looking to boost performance. Many technicians report significant improvements in power and torque after upgrading from traditional PMDC motors to brushless DC units.
Encoder components deserve special attention in your spare parts strategy. These precision feedback devices fail more often than motors themselves, and you can often restore full spindle function without replacing the entire motor assembly.
Technical documentation becomes invaluable when you’re troubleshooting. Download and organize current service manuals, parameter lists, and wiring diagrams for every machine in your facility. For additional technical resources and industry standards, the National Institute of Standards and Technology provides valuable manufacturing guidelines and precision measurement standards.
Online communities and user forums connect you with technicians who’ve solved the exact problem you’re facing. These platforms are goldmines of real-world experience and creative solutions.
When your spindle motor replacement project exceeds your in-house capabilities, professional support makes the difference between a successful repair and costly mistakes. Explore our complete range of spindle services for expert motor replacement and comprehensive on-site support that gets your production line running smoothly again.
Frequently Asked Questions about Spindle Motor Replacement
How long does a typical replacement take?
Spindle Motor Replacement timing varies significantly based on your machine’s design and technician experience. Most industrial manufacturing spindle motor replacements take between 4 and 8 hours from start to finish.
Simple belt-driven systems are usually the quickest to service, typically completed in 4 to 6 hours. Complex inline pin-drive systems require more time and precision, often taking 6 to 8 hours. Non-contact encoder systems add another 1 to 2 hours to any job.
Can I upgrade from PMDC to BLDC without changing the controller?
It depends entirely on your specific controller and machine model. Many modern CNC controllers can handle both motor types with the right parameter adjustments. Newer controllers typically have the built-in capability to drive brushless motors, while older controllers may lack the necessary drive electronics.
Verify whether your controller supports brushless motor commutation and if parameter files are available from your machine manufacturer. Power supply considerations matter too – your existing power supply must have adequate voltage and current capacity for the new motor.
What run-out tolerance should I expect after installation?
Professional installations should consistently achieve 0.002″ TIR or better. This tolerance is essential for maintaining machining accuracy and ensuring proper bearing life in your industrial manufacturing spindle.
Several critical factors affect your final run-out results: proper mating surface preparation, correct bolt torque sequence and values, and accurate encoder ring installation. If you’re not achieving acceptable run-out, start troubleshooting systematically by checking for debris or burrs on all mating surfaces first.
Conclusion

There’s something deeply satisfying about hearing a CNC machine come back to life after a successful spindle motor replacement. That smooth hum of a properly installed motor, the precision cuts flowing effortlessly through material, and the knowledge that your production line is running strong again – it’s what makes all the careful work worthwhile.
Throughout this guide, we’ve walked through the complete journey from recognizing the warning signs of spindle motor failure to celebrating successful test cuts with your newly installed motor. You now understand the critical difference between a quick fix and a professional installation that will serve your operation for years to come.
Safety always comes first – never skip those lockout/tagout procedures. Documentation saves headaches – those photos and wire labels prevent costly mistakes. Precision matters – maintaining run-out tolerances and proper alignment separates amateur work from professional results.
The industrial manufacturing world doesn’t slow down for equipment failures. When aerospace components need machining or defense parts require precision cutting, your spindle motor needs to perform flawlessly. Understanding when you can handle the replacement in-house versus when to call for professional help protects both your equipment and your production schedule.
At MZI Precision, we’ve seen it all – from emergency repairs that save critical production runs to planned upgrades that boost performance beyond original specifications. Our team understands that spindle motor replacement is more than just swapping parts; it’s about restoring the heart of your manufacturing operation with the precision and reliability your business demands.
When you need that combination of expertise, speed, and reliability that only comes from specialists who live and breathe spindle technology, we’re ready to help. Get your spindle running like new with our professional rebuilding services – because your production schedule can’t wait for anything less than perfect.